In which direction the light is bent depends on the shape of the lens. Lenses that have a bulge in the center that curves outwards are known as convex lenses.
These are known as
converging lenses because when light passes through them, it is bent inward
towards a focal plane.
An example of this is a magnifying glass. If you hold it
a certain way outdoors in the sun, you can see the light pass through the lens
of the magnifying glass and converge to a single point.
That’s the focal plane and can burn quite badly because all
the sun’s rays are being focused on one single spot.
Another way a lens
can change the direction of light is by diverging or spreading it outwards
instead of inward. Concave lenses are known to bend light this way. Unlike
convex lenses, concave lenses curve inward in the middle.
How a compound lens system works
An image captured using one lens is usually not good enough for
photography. And that’s why the smartphone camera lens is made up of more than
just one lens.
The lens unit contains a series of convex and concave lenses of
various densities that work together to direct the light through to the sensor
to create an image.
The lens is designed this way so that the camera can create an
image that is as accurate as possible. You want your photos to look perfectly
sharp all around, even at the edges and not just in one area.
There is a whole science behind exactly how this works but it’s
beyond the scope of this article. Simply put, the light rays that enter through
the camera go through a series of divergence and convergence until they finally
reach the sensor.
The quality and the positioning of these lens elements are of utmost importance otherwise
the resulting images might just suffer from issues such as chromatic
aberration, blurring, and reduced contrast.
Lens focal length and angle-of-view
Nowadays mobile phones commonly have more than one camera. In
the majority of cases, these cameras have lenses with different focal
lengths. This means the pictures taken by each camera are different.
Focal length,
which is expressed in millimeters (mm), is basically an indication of how much
of a scene a particular lens can cover.

In brackets, you’ll see written, wide, ultrawide, or
telephoto. This refers to the angle-of-view of each lens.
The shorter the
focal length, the wider the angle-of-view. The longer the focal length, the
more magnified the image is, and therefore the narrower the angle-of-view.
Zoom
When you zoom in on a subject using a DSLR camera, the lens
elements inside the lens barrel move around in order to change the focal length
of the lens and enlarge the subject.
This is known as
optical zoom because the lens elements themselves actually move.
Digital
zoom
For a long time, single-camera smartphones could not zoom
in optically. That’s because they had a lens that had a fixed focal length.
In other words, the lenses didn’t have movable parts that could
zoom in to a subject. Instead, mobile cameras used to rely on digital zoom,
which was an inferior form of zoom.
With digital zoom,
the more you zoom in, the more the camera crops the
image and digitally enlarges it to fill the frame. This results in
very poor-quality pictures.

Optical
zoom
When dual-camera smartphones were introduced some years back,
smartphone companies started marketing their cameras as having 2x optical
zoom.
This is because the two cameras had lenses with different focal
lengths. One had a wide-angle lens and the other had a telephoto lens.
Switching between the two cameras would make it seem like you
optically zoomed in twice the focal length of the wide-angle lens without
losing quality as you would with digital zoom. However, in most if not all such
cases, it’s not truly optical zoom.
How this works in most cases is that when you zoom in,
the camera interpolates, or mixes, the pixels from the sensors of the two
cameras and creates a hybrid image. So, in essence, there aren’t any
moving parts in this type of zoom just like with digital zoom.
The only difference is that this hybrid type of zoom retains better picture quality
because of the telephoto lens of the second camera.
Periscope
zooms
Periscope zoom is a game-changer because it works completely
differently from the traditional way a mobile camera zoom.
Because of its sideways positioning inside the phone’s body, the
periscope camera has quite a large zoom lens that doesn’t stick out of the back
of the phone.
And because the
zoom lens is relatively large for a phone camera, you can actually zoom in
optically with it. In other words, as you zoom in and out, the lens elements
inside the periscope zoom lens physically move.

At the time of this writing, the most you can zoom in optically
with a mobile phone that has a periscope, camera is 5x without
degrading picture quality.
It’s worth pointing out that no matter which type of zoom you use,
you will need to keep your camera steady to avoid blurry shots.
The more zoomed in you are the more apparent camera shake becomes and that
leads to undesirable photos.
Focus
The positioning of the lens elements also affects the focus.
When you zoom in and out, you need to adjust your focus if you’re shooting
in Manual mode. Otherwise, your phone can automatically adjust the focus for
you. Smartphone cameras employ different methods to get an image in focus automatically.
The most popular method at the moment of this writing is Dual
Pixel Auto-focus. But it seems a new technology called 2x2 OCL is
starting to gain some traction.
No matter which method of auto-focus a phone camera uses, the
principles of how the lens elements work to get the focus right are pretty
much the same.
Once you have selected where you want to focus in the frame, the camera’s ISP (which
we’ll look at later) does some calculations and forwards the
correct focus data to the focus motor. This motor then aligns the lens
elements to a point where the focus is set where you want it to be.
So, as you can see, there’s quite a lot that goes on with the
lens. And for good reason. Without the lens, the light coming through the
camera will have no direction. Yes, a camera can take photos without a lens
but you won’t get a sharp image.
Next in the
process of turning light into an image is an area that controls
exactly how much light can get through to the sensor?
Aperture
Aperture refers to the opening that determines how much light can
reach the sensor. On a traditional DSLR lens, the aperture is adjustable. The
wider the aperture, the more light goes through.
Aperture is
expressed in f-stops. The higher the f-stop, the narrower the aperture, and
therefore less light coming through. The lower the f-stop, the more light comes
through.

For example, setting your aperture to f/2.2 would allow more light
to come through than if you set it to f/8.
This helps when
you need to adjust your exposure to suit various lighting situations but it
does also affect the depth-of-field.
How does aperture work on mobile phones?
However, on smartphones things are different. Mobile cameras have
a fixed aperture and therefore it cannot be adjusted for different lighting
conditions. In the case of mobile cameras, the larger the aperture, the better.
Because smartphone cameras are so small, they need every little
bit of light that they can get. The aperture of mobile phones has been getting
bigger and bigger over the years.
The widest aperture on a mobile camera currently is f/1.4, which
is pretty wide for a phone. That’s one of the things you should look
out for when comparing smartphone cameras.
Starting with the Galaxy S9, Samsung introduced a variable
aperture to its flagship cameras. This allowed the photographer to switch
between f/1.5 and f/2.4.
Once as much light
as required has passed through the aperture, it’s well on its way to the sensor
to be processed into a photo. But first, the light has to go through an
important process.
Image stabilization
Image stabilization is very important if you want to capture
crisp images without any shake or blur.
This is achieved by having either the lens or sensor move on a
gyroscope system that counteracts any minor movements and jitters. This is
known as optical image stabilization or OIS.
There is also electronic image stabilization but that’s more
geared towards filming and video applications than mobile photography.
Image stabilization in smartphone cameras is achieved by using a sensor-based optical image stabilization system that moves the camera’s image sensor to cou
However, optical image stabilization cannot compensate for large
camera movements. For that and many other reasons, it’s best you use a camera
support
Shutter
The things that makes optical image stabilization necessary in
smartphone cameras is the shutter and the speed at which it operates.
In bigger and dedicated cameras, before the light can
reach the sensor, it has to jump through one more hoop-- the shutter. This is a mechanical device that is positioned in front of the sensor and blocks light
from reaching the sensor.
When the shutter button is pressed to take a photo, the mechanical
shutter opens up and exposes the sensor to light for a certain period and then
closes again. The amount of time the shutter remains open is known as shutter
speed.
The faster the shutter opens and closes, the less blurry your
shots will be. The downside is that your pictures will look considerably dark without
adequate lighting.
A slow shutter speed allows the sensor to be exposed to light for
an extended period. This works well for brightening up the image in low light
conditions. However, the trade-off is that the slower the shutter speed, the
likelier you are to have blurry images.
And this is where image stabilization helps. It allows you to
shoot at a reasonably slow shutter speed without messing up your photo.
However, the slower you go with the shutter speed, the more difficult it
becomes for mobile camera OIS to keep up. So, again, you need to support the
camera phone to avoid blur.
Mobile cameras don’t have mechanical shutters. They operate
electronically by activating and deactivating the sensor for a
certain period.
So, in smartphone cameras, as soon as light makes it through the
aperture and has been stabilized, it has pretty much arrived
at the destination sensor-vile. However, it won’t be registered until the
sensor is activated.
Just like with the mechanical shutter, the amount of time the
sensor remains activated is known as shutter speed. Despite their physical
difference, these two types of shutters affect the image in the same way.
So, now that our
light has finally reached the sensor, let’s look at how it’s converted into an
image.
The sensor

The sensor is basically the backbone of digital photography
because that’s where the imaging happens.
It is made up of millions of pixels (or photosites as others call
them) that make up the total number of megapixels of the camera.
Photo site/Pixels
When taking a picture and the sensor is activated and deactivated,
these pixels switch on and off and capture the incoming light.
The light photons
that hit the photosites are turned into an electrical signal that varies in
strength depending on the number of photons captured in each photo site.
This data is then processed and turned into an image.

It is worth noting that processing an image from the electrical
data from photo sites results in a monochrome image, not one with color.
This is because
the sensor on its own can only determine how many light photons it has
collected. It can’t tell what color the photons are.
Colour filter array
For a mobile camera to capture color images, a color filter
is required. The Bayer filter array is the most popular on a lot of sensors.
This is a color
filter that is placed over each photosite to determine the color of the
image. It acts as a screen that only allows photons of a certain color into
each pixel.
The Bayer filter
is made up of alternating rows of blue/green and red/green filters. The blue
filter captures blue light, the green filter captures green light, and the red
filter captures red light. The light that doesn’t match the filter is
reflected.

Because so much light is being bounced off the filter (about two
thirds), the camera has to calculate how much of the other colors are in each
pixel.
The measurement of electrical signals from neighboring photosites
is used to determine this and ultimately the color of the entire image.
Image signal processor
The sensor is not where the creation of an image ends. The
image created in the steps above is simply latent.
This means that even though the image is captured, it’s not yet
fully developed. There’s still some processing work to be done, and then
the final image is created.
This is what the image signal processor (ISP) is responsible for.
The ISP is the brains of a mobile camera. It’s a special processor that takes
the raw image data from the camera’s sensor and converts it into
a usable image.
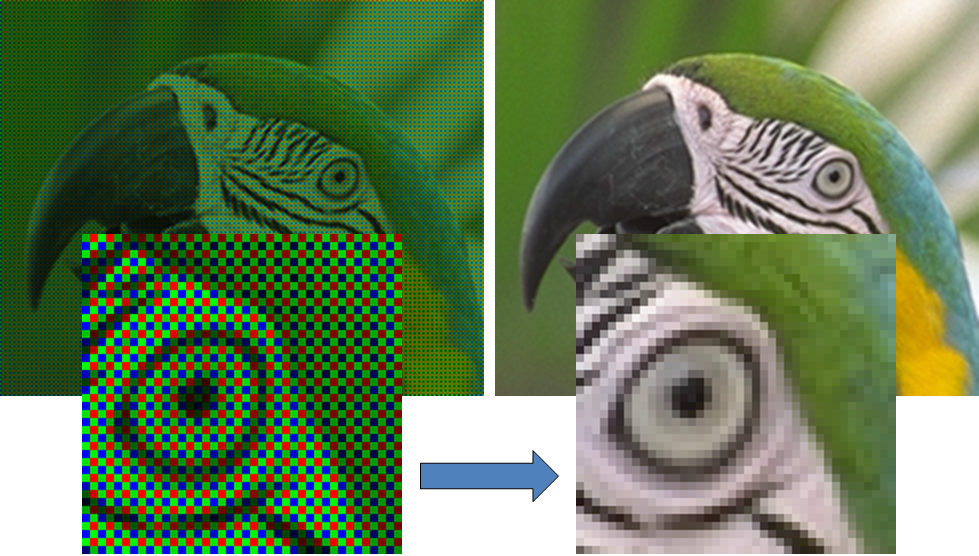
The image signal processor performs a number of tasks in order to
get to create the final image. The first step is known as demosaicing.
This is the process already mentioned above where the processor, which knows the color of the filter on each photosite, analyses the electrical signals from neighboring photosites to determine the color of each pixel.

Source: ok.ctrl.titech.ac.jp
Once this is done, the image signal processor continues to apply
more corrections to the raw image.
Other fixes include things such as noise reduction, lens shade
correction, and defect pixel correction.
The ISP also makes adjustments to parameters such as white
balance, auto-focus, and exposure. And because the work of the image signal
processor relies heavily on algorithms, it’s also responsible for things such
as HDR, night mode, EIS, image compression, etc.
Once the image
data captured by the sensor has gone through the processing pipeline, you have
a final image which you can edit, save on your phone, share online, or even print
out to frame and display.
Camera software
Of course, none of the above would be of any use if you have no
way to access the camera. To be able to take photos with your camera phone, you
need an app that will allow you to communicate your commands to the phone’s
camera module.
From the app, you can choose what resolution you want your photos
to be, where you want them to be saved, and whether you want to save the photos
as RAW or jpeg files (provided your camera can do this).
Of course, there are other things you can do from the camera app
such as switch between cameras, apply filters, activate HDR, change the app’s
settings, and more.
All camera phones come with a native camera app installed which is
usually set to take photos in Auto mode by default.
This allows you to just point your camera at what you want to
capture and click away. The camera automatically calculates what it thinks to
be the best settings for the shot so you don’t have to worry about it.
Some native camera apps on popular smartphones allow you to switch
to Manual mode. This mode gives you the chance to take full control of the
camera and adjust settings like shutter speed, ISO, white balance, and others yourself.
It’s honestly worth it to learn Manual mode because of how it
can greatly impact the look and feel of your photos in a good way.
Conclusion
So, now you know what happens when you tap that shutter button on
your smartphone. But it’s one thing to know how a mobile camera works. Knowing how
to use it properly to capture great photos is another.

Nice blog jarviz
ReplyDelete